

Learn how to translate a 2D stylized concept into a 3D character with this 6-hour workshop by Daniel Zeni. Using ZBrush and Photoshop, Daniel walks through the complete process, from selecting a suitable concept to coloring the character accurately and achieving a polished final image.
Daniel begins with an in-depth explanation of setting up a concept in ZBrush and shows how to use the Spotlight projection tool to your advantage. He instructs on sculpting the overall shapes and using Symmetry to align the body with the head as well as how to save out camera angles using ZAppLink. You’ll also discover how saved camera angles can help you further line up a mesh up with your concept each time you make a change, ensuring a close match to your original concept.
As a Gnomon School graduate with experience working in everything from effects for film and episodic animation to consumer products and mobile games, Daniel has an arsenal of tried-and-tested tips and tricks for character creation that he shares throughout 11 chapters. You’ll also learn his techniques for taking advantage of ZBrush’s ZModeler and see how it can be instrumental in a character-creation workflow, even for organic subjects.
The final stage of the workshop shows how to select the correct colors from the concept and a quick-and-easy way to achieve a nice, clean, final image ready for your portfolio.
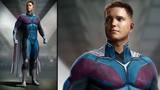
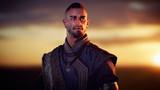
The concept used in this workshop is by the talented Việt Nguyễn and used with permission.
11 Lessons
Translating 2D concept art into functional 3D models is a highly requested skill in the entertainment industry, and this introduction establishes the foundation for Daniel Zeni's lessons. He explains why artists shouldn't be intimidated by working with limited reference material and how to use the right techniques and practice to make it achievable. The course will equip artists with practical skills for creating portfolio-worthy work that demonstrates their ability to bridge the gap between 2D design and 3D realization.
Duration: 3m 14s

The blocking-out phase is crucial for establishing accurate proportions and forms before investing time in high-resolution details. By initially maintaining low topology and continuously checking against the concept reference, artists can make significant adjustments quickly without wasting effort on premature detailing. This repetitive approach of placing shapes, checking alignment, and refining as elements are added creates a solid foundation for the detailed sculpting phases that follow, ensuring the final 3D model accurately captures the essence of the original 2D concept.
Duration: 37m 33s

In this lesson, Daniel emphasizes a practical but efficient approach to character blocking that prioritizes speed and overall form over perfection. Daniel demonstrates the decisions artists can make regarding when to use symmetry or asymmetry, and how to break complex tasks into manageable phases. By focusing on getting the basic shapes and proportions correct first, he details how to create a solid foundation that makes subsequent topology and detailing easier and more successful.
Duration: 19m 40s

This lesson demonstrates that creating professional topology in ZBrush is more about technical understanding of geometry flow than artistic sculpting ability. By systematically building facial features using ZModeler's poly modeling tools and maintaining awareness of edge loop placement based on anatomical structure, clean animation-ready topology can be achieved. Daniel's willingness to repeatedly adjust and rebuild sections reinforces that flexibility and problem-solving are essential skills in the topology creation process.
Duration: 51m 5s

This lesson presents a practical, efficiency-focused approach to character modeling that prioritizes matching concept art over strictly following production pipelines. By building body parts separately in T-pose with clean topology, then posing them later, Daniel demonstrates how to adapt traditional techniques for specific project needs. Emphasizing proper edge flow, joint topology, and anatomy during the modeling process, instead of fixing issues later. This results in a solid foundation for a stylized character sculpture that maintains the flexibility of good topology without the overhead of full rigging.
Duration: 41m 57s

This lesson highlights that successful character posing in 3D sculpting is primarily about patience and methodology rather than technical complexity. Daniel demonstrates why taking time to make small, careful adjustments while frequently checking topology integrity results in cleaner final work than rushing through the process. The key lesson is that manual posing, while time-consuming, is the most efficient approach for matching specific concept art when animation isn't required.
Duration: 44m 35s

This lesson emphasizes a flexible, efficient workflow in ZBrush that prioritizes form over perfection during initial modeling stages. Daniel demonstrates that successful character modeling comes from strategic topology planning, extensive use of polygroups for control, and constant reference to concept art. Working at a low resolution and not treating early topology as precious, artists can iterate quickly while maintaining the flexibility to refine and add detail later in the process.
Duration: 34m 26s

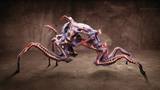
This lesson demonstrates an efficient approach to creating complex, layered fur details by reusing and modifying base geometry rather than modeling from scratch. The emphasis on proper topology management, particularly around sharp points and connection areas, ensures the fur will deform correctly and maintain its shape. By strategically deleting interior geometry and building layers that sit properly on top of each other, the final result will be both visually accurate and technically sound for animation and posing.
Duration: 24m 4s

Throughout this lesson, Daniel demonstrates a professional workflow for creating realistic character clothing in ZBrush, emphasizing the importance of proper topology management and construction-based modeling. The instructor's approach of building garments as they would be made in reality, with seams, separate pieces, and appropriate thickness, results in more believable final models. The combination of traditional polygon modeling techniques with ZBrush-specific tools such as nanomesh and deformers creates an efficient pipeline for creating detailed character props and clothing that closely match the concept art while maintaining clean, workable geometry.
Duration: 38m 34s

This lesson explains a professional workflow for hard surface and organic prop modeling that prioritizes efficiency and flexibility. Daniel's industry-standard approach maintains simple topology throughout the blocking phase, reuses assets creatively, and progressively adds detail only when shapes are finalized. The emphasis on intentional imperfections and natural layering of elements shows how technical modeling skills combine with artistic sensibility to create believable, characterful props that support the overall design narrative.
Duration: 43m 2s

Daniel wraps up with a complete production pipeline for creating stylized 3D characters in ZBrush, from modeling through final presentation. Daniel emphasizes closely matching the concept art while adding storytelling details, such as wear and imperfections, and stresses the importance of breaking symmetry to create lifelike characters. This workflow balances technical precision with artistic sensibility, showing that even stylized work requires careful attention to edge quality, proper subdivision techniques, and thoughtful detail placement that enhances rather than distracts from the character's silhouette.
Duration: 24m 13s

Primary tools
For this workshop you’ll need:
Skills Covered
Who’s this Workshop for?
This workshop is designed for intermediate 3D and character artists with basic ZBrush knowledge who want to master the translation from 2D concept art to polished 3D characters. It's particularly valuable for those working in games, animation, or the entertainment industries.
Aspiring character artists and concept designers transitioning to 3D will significantly benefit from Daniel Zeni’s production-proven techniques. Artists will gain essential skills for maintaining concept accuracy while developing efficient workflows that meet industry standards.
Learning Outcomes
By completing this workshop, artists will have mastered a complete pipeline for translating 2D stylized concepts into polished 3D characters using industry-standard techniques.
Key skills include:
- How to set up and use the Spotlight projection tool effectively for concept alignment.
- How to sculpt overall character shapes while maintaining accurate proportions and form.
- How to utilize Symmetry tools for proper alignment between body and head elements.
- How to save and use camera angles with ZAppLink for consistent concept matching.
- How to leverage ZModeler for organic character creation within ZBrush workflows.
- How to select accurate colors from concepts and achieve clean final portfolio images.


