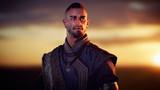


In this workshop, Sohrab Esfehani, Senior VFX Artist at Important Looking Pirates, walks artists through the full process of texturing and look development for a photorealistic, film-quality fantasy creature. With over 20 years of experience working on films including The Avengers and Guardians of the Galaxy, Sohrab shares his professional techniques using industry-standard software, Mari, ZBrush, Nuke, and Houdini, to create blockbuster-worthy results.
This 6-hour workshop begins with reference gathering before launching Houdini, where the scene is initially structured and basic shaders are applied. From there, Sohrab details the skin texturing workflow using Mari, from the initial setup through various stages of adding color, including how to use ZBrush for creating surface details. He also dives into the process of setting up realistic skin shaders in Arnold, within Houdini, and details how to approach complex fur patterns and designs using advanced layered, probability-based shading techniques.
As well as covering the technical side of texturing and look dev for film-quality creatures, Sohrab also discusses the art direction involved in such a project and explains how he approaches developing creatures or characters into believable and relatable results that will feel as though they truly belong on-screen. By completing this workshop, the goal is for artists to develop the confidence to apply the practical ideas and techniques covered to their own creature and character projects.
23 Lessons
Sohrab Esfehani introduces his workshop, which provides a professional, production-quality approach to creature texturing and look development using industry-standard tools and iterative refinement techniques. By combining Mari, Houdini, Nuke, and Arnold in a structured pipeline, he demonstrates how to build complex, believable creature textures from the ground up. His emphasis on reference gathering and alternating passes between different surface types showcases real-world production workflows for achieving high-quality character results.
Duration: 3m 8s

This lesson establishes a professional, well-organized workflow for character look development spanning multiple industry-standard tools. Sohrab emphasizes the importance of clean scene structure and demonstrates the complete process from basic shader setup through detailed texture creation, ultimately recreating all materials to show best practices for organization and quality in production environments.
Duration: 7m 11s

This lesson establishes a professional production workflow for character look development in Houdini, using Arnold for rendering. Sohrab's systematic approach to material assignment, multi-light evaluation, and organized groom management creates an efficient pipeline for iterating on character appearance. By setting up comprehensive AOVs and light groups from the start, his workflow enables flexible compositing and lighting adjustments downstream, which is essential for high-quality character rendering in production environments.
Duration: 14m 54s

This lesson establishes the foundational knowledge needed for professional texturing workflows, bridging shader theory with practical Mari application. By understanding both the technical properties that control material appearance and the organizational systems for painting texture maps, artists can learn how to create efficient, non-destructive workflows. Sohrab's emphasis on proper setup, color space management, and reusable isolation masks demonstrates industry-standard practices that enable complex character texturing while maintaining flexibility for future adjustments.
Duration: 25m 57s

This lesson showcases a professional texturing workflow that emphasizes iterative refinement and non-destructive editing. Sohrab demonstrates that, even with high-quality source materials such as Texturing XYZ assets, significant customization is required for hero characters to ensure textures align properly with unique geometry. His systematic approach to working between Mari and Nuke, maintaining organization, and repeatedly checking results in context is essential to achieving production-quality results. His workflow demonstrates that patience and attention to detail during the base color stage establish a solid foundation for subsequent texturing.
Duration: 15m 47s

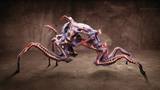
This lesson outlines a professional production workflow for refining CG creature models in ZBrush, emphasizing that manual sculpting remains essential even with high-quality displacement textures. Sohrab's methodology of combining procedural textures with hand-sculpted details, using layers and morph targets for control, and constantly referencing real anatomy creates a foundation for photorealistic rendering. His workflow prepares the model for the next phase of texturing in Mari, where the exported displacement maps will be combined with additional procedural and painted details to achieve final quality.
Duration: 24m 36s

This lesson emphasizes the importance of technical precision combined with artistic observation when texturing organic surfaces. Sohrab's workflow demonstrates that realistic digital texturing requires understanding both the technical tools (projection modes, baking systems, node graphs) and biological reference material. His iterative approach to creating foundational masks and details, with the expectation of future refinement, reflects a professional production methodology in which texturing is a collaborative process across multiple pipeline stages rather than a single, final step.
Duration: 11m 55s

This lesson showcases a professional texturing workflow that balances procedural efficiency with artistic manual painting to achieve photorealistic organic details. Sohrab explains the importance of constant reference comparison, organized node systems, and understanding how anatomical features naturally display color gradients and surface variations. His iterative approach to building detail in texturing before moving to look development — while remaining flexible to revisit areas — demonstrates an experienced production methodology suitable for high-quality character work.
Duration: 14m 37s

This lesson showcases advanced displacement mapping techniques in Mari, demonstrating how to strategically combine procedural textures with photographic references to create realistic organic surfaces. The node-based approach provides flexibility to isolate, manipulate, and layer different detail levels stored in RGB channels, resulting in convincing creature skin textures. The instructor's methodical workflow of testing, referencing, and iterating ensures the displacement maps achieve the desired level of realism for production-quality character assets.
Duration: 11m 2s

This lesson provides a comprehensive approach to creating physically accurate specular-roughness and clear-coat maps for character texturing. Sohrab emphasizes the importance of understanding material properties, using appropriate IOR values, and building texture maps with both broad value assignments and subtle procedural variation. His dual-map approach (one specular-roughness map working in conjunction with a clear-coat map) provides sophisticated control over surface moisture and shininess, which is essential for achieving photorealistic results in look development.
Duration: 25m 38s

This lesson establishes a professional pipeline for texture map preparation, emphasizing organization and non-destructive workflows that are essential for production environments. Sohrab's systematic approach to creating ISO maps, managing node graphs, and properly exporting assets demonstrates industry-standard practices that ensure consistency and quality control across team projects. With all maps prepared and exported, the project is now ready to transition into the look-development phase in Houdini.
Duration: 11m 44s

This lesson demonstrates professional-level scene organization in Houdini, emphasizing that proper structure and naming conventions are essential for efficient shader development. By investing time upfront to create a centralized, fetch-node-based system for texture maps, artists can learn how to avoid repetitive work and maintain cleaner, more manageable networks. Sohrab's emphasis on organization reflects industry best practices that will become increasingly valuable as project complexity grows.
Duration: 9m 25s

This lesson showcases Sohrab's professional character look-development workflow centered on displacement mapping as the foundation. He emphasizes the importance of iteration, proper value management, and regional control to achieve believable skin, eyes, and facial details. He explains why successful character rendering requires methodical testing, proper technical setup of Arnold attributes, and recognizing that eyes are the critical element that sells character believability, as well as why making displacement and detail work on features like the iris is essential to the overall success.
Duration: 13m 27s

This lesson emphasizes that realistic character rendering requires thoughtful integration across all disciplines. Sculpting, texturing, and shading must share common information and complement each other. Sohrab demonstrates that proper displacement and well-crafted maps are fundamental to achieving realism, and explains why the real magic happens when using procedural controls such as ISOs and range nodes to fine-tune material properties by region. His methodical approach of isolating components, reading actual pixel values, and constantly referencing real-world images ensures technically accurate and visually convincing results.
Duration: 16m 34s

This lesson presents a practical solution to a common technical challenge in fur rendering by replacing direct texture projection with probability-based layering. By combining position, softness, and percentage controls in a modular shader network, artists can learn how to achieve detailed, varied fur coloration that accurately reflects reference imagery while maintaining full artistic control. His approach, while requiring more initial setup than simple texture mapping, provides the precision and flexibility needed for hero-character fur that would otherwise appear unrealistically uniform or blurry.
Duration: 26m 22s

This lesson establishes Sohrab's systematic approach to creating realistic fur coloration through probability-based shading in Houdini. By combining painted attribute maps with layered melanin values and careful position control, he demonstrates how to achieve natural color variation and gradients across creature fur. His emphasis on organization, naming conventions, and reference-based decision-making provides a solid foundation for complex fur-shading work that will be refined in subsequent chapters.
Duration: 14m 39s

This lesson demonstrates Sohrab's professional creature-grooming workflow, which prioritizes artistic exploration through paintovers before technical implementation. His approach to painting probability maps directly in Houdini offers a more efficient alternative to traditional external texture-painting workflows, enabling rapid iteration while maintaining tight integration with the fur system. His emphasis on getting facial features — particularly the eyes and stripe patterns — correct before moving to the body reflects industry best practices, since the face is both the most visible and challenging area to make believable. The foundation laid by the stripe probability maps will serve as the basis for multiple color-variation layers in subsequent work.
Duration: 21m 32s

This lesson demonstrates a sophisticated, non-destructive approach to fur pattern development that prioritizes flexibility and experimentation. By understanding the technical differences between attribute transfer methods and strategically combining them, artists can learn how to achieve both the sharp, controlled patterns needed for distinctive markings and the natural, blended transitions that make fur look realistic. Sohrab's derivative map workflow is effective for iterative refinement without risking the loss of previous work.
Duration: 17m 54s

This lesson illustrates that high-quality fur look development is an iterative, time-intensive process that requires patience and continuous refinement through test renders and paint-over analysis. Sohrab demonstrates that combining technical knowledge of probability shading with artistic judgment about when to break traditional rules (such as using attribute transfer instead of standard methods) produces superior results. While this level of detail is reserved for hero characters with significant screen time, his techniques (layering multiple melanin values, strategic use of position and softness parameters, and analyzing renders from all angles) are fundamental to achieving photorealistic fur that holds up under scrutiny.
Duration: 22m 49s

This lesson demonstrates that achieving photorealistic fur requires patience, organization, and attention to subtle details. Sohrab's process involves building up multiple probability map layers, each contributing small improvements toward the final realistic result. While time-intensive, his iterative approach of painting, rendering, comparing, and refining is essential for pushing past the "good enough" stage into truly convincing realism that justifies the extra effort when project requirements allow.
Duration: 12m 59s

This lesson showcases an efficient workflow for creating realistic fur patterns by painting directly on fur geometry in Houdini, eliminating much of the guesswork inherent in traditional texture painting methods. Sohrab's layered approach to melanin distribution from hair root to tip, combined with multiple probability maps at varying strengths, produces natural-looking patterns with authentic per-hair variation. His iterative process of rendering, analyzing, and refining demonstrates how achieving believable organic patterns requires constant evaluation and a willingness to adjust both bold patterns and subtle details until the overall effect feels balanced and natural.
Duration: 16m 19s

This lesson demonstrates a professional VFX workflow that balances technical proceduralism with artistic control. Sohrab’s methodology of using wedge tests for scientific validation, combined with detailed hand-painted probability maps for artistic direction, creates a robust system for achieving photoreal creature fur. His layered approach to both shading variation and dirt accumulation ensures the creature looks believable, with natural variation that avoids uniformity while maintaining consistency with the character's design and environmental story.
Duration: 25m 34s

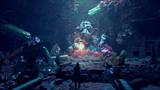
This final lesson demonstrates Sohrab's professional, film-quality approach to creature look development, emphasizing procedural techniques and layered probability shading to achieve complex, realistic results. He successfully transforms an overly clean character into a convincing creature with natural dirt accumulation, varied fur properties, and subtle imperfections. His methodology demonstrates how patience, systematic layering, and thoughtful use of Houdini's procedural tools can create production-ready characters without relying on painted textures, making it an invaluable resource for artists working on similar high-end character projects.
Duration: 28m 58s

Primary tools
For this workshop you’ll need:
Skills Covered
Who’s this Workshop for?
This workshop is intended for artists who want to create believable, film-quality fantasy creatures through advanced texturing and look development workflows. It is best suited for intermediate to advanced 3D artists who already understand the basics of texturing, shading, and rendering, and want to push their work toward a high-end cinematic standard. Artists focused on creature work, character surfaces, and visual realism will find the material especially relevant.
Texture, look development, and character artists preparing for VFX-focused roles will benefit from an emphasis on both technical execution and artistic judgment. The workshop addresses how surface detail, shading decisions, and art direction work together to create creatures that feel cohesive, grounded, and credible on screen.
Learning Outcomes
By completing this workshop, artists will be able to:
- Gather and interpret references to inform realistic and cohesive creature surface design
- Set up organized scenes and base shaders that support efficient look development workflows
- Build layered skin textures that balance color variation, realism, and visual clarity
- Create surface detail and micro-variation that enhances believability without overwhelming the design
- Construct advanced skin and fur shaders using layered and probability-based approaches
- Make art direction decisions that support narrative, tone, and character credibility
- Apply a production-ready look development workflow to original creature or character projects


